How I Made Solar Mason Jar Lights for the Garden
How I Made Solar Mason Jar Lights for the Garden
If you’re looking to add a charming touch to your garden, solar mason jar lights are an excellent choice. These simple yet effective decorations can create a warm ambiance during evening gatherings. You’ll need just a few materials and some straightforward steps to make your own. Let’s explore how to transform ordinary mason jars into enchanting light sources that will brighten up your outdoor space.
Key Takeaways
- Gather mason jars, solar lights, and decorative elements like stones or beads for a personalized touch.
- Clean and prepare jars, removing labels and applying paint or decorations if desired.
- Secure the solar light to the jar lid with adhesive and place components inside the jar.
- Choose a sunny location for optimal sunlight exposure and arrange jars in clusters for enhanced ambiance.
- Experiment with height variation and reflective surfaces to amplify the overall lighting effect in your garden.
Materials Needed for Solar Mason Jar Lights
Creating solar mason jar lights is a delightful and straightforward project that can brighten up your garden. To get started, gather a few essential materials for your DIY mason jar lights. You’ll need mason jars, solar garden lights, and waterproof glue. Choose jars that fit your style, and make sure the solar lights have removable stakes. You might also want decorative stones or fairy lights to add a personal touch. Once you have your supplies, you’re ready to create enchanting outdoor lighting. This project not only enhances your garden but also allows you to enjoy a creative DIY experience. Additionally, using solar garden lights is crucial for ensuring your jars receive adequate sunlight to charge effectively.
Preparing the Mason Jars
Start by cleaning your mason jars thoroughly to ensure they’re free of dust and residue. Use warm, soapy water and a sponge to scrub the inside and outside, then rinse well. Allow them to air dry completely.
Next, if your jars have labels, peel them off and soak the jars in warm water to remove any sticky residue. A bit of rubbing alcohol on a cloth can help with stubborn spots.
Finally, consider painting or decorating the jars if you want a personalized touch. Make sure any embellishments are dry before you move on to the next steps. Additionally, using upcycled materials like jars for garden tools can enhance both functionality and aesthetics in your gardening experience.
Installing the Solar Lights
Once your mason jars are prepped and ready, it’s time to install the solar lights.
Begin by placing the solar components inside each jar, ensuring they fit snugly.
Next, choose a sunny spot in your garden where the lights will soak up sunlight during the day.
Consider these tips for optimal installation:
- Positioning: Place the jars where they’ll receive direct sunlight for several hours.
- Stability: Use a sturdy base or stake to prevent them from tipping over.
- Visibility: Arrange them in clusters for a beautiful display that enhances your garden’s ambiance.
Additionally, incorporating creative lighting techniques can elevate the overall effect of your garden’s nighttime appeal.
Now, enjoy your glowing creations!
Decorating the Mason Jars
Now that your solar lights are securely installed in the garden, it’s time to bring your mason jars to life with some creative decorations.
Start by painting the jars with weather-resistant spray paint for a vibrant touch.
You can also wrap twine or burlap around the neck for a rustic vibe.
Consider adding embellishments like beads or shells for a personal flair.
If you’re feeling adventurous, try decoupage with colorful tissue paper.
Remember to leave the jar openings clear for light to shine through.
These simple touches will transform your mason jars into charming focal points in your garden. Additionally, using upcycled materials can further enhance the charm while keeping costs low.
Assembling the Solar Mason Jar Lights
Now that your mason jars are beautifully decorated, it’s time to assemble your solar lights.
You’ll need a few materials and some simple step-by-step instructions to get everything set up.
Plus, I’ll share tips to ensure your lights shine brightly in the garden! One great way to enhance your garden’s aesthetic is by incorporating upcycled garden hacks, which can elevate your eco-friendly paradise while saving resources.
Materials Needed for Assembly
To create your own solar mason jar lights, you’ll need a few essential materials that are easy to gather.
Start by collecting these items:
- Mason jars: Any size works, but larger jars provide more light.
- Solar garden lights: Look for ones with removable stakes for easier assembly.
- Twine or wire: This will help you hang or secure the jars in your garden.
Once you have these materials, you’re ready to begin the fun part of creating your beautiful solar lights.
Gather your supplies, and let your creativity shine as you transform your garden space!
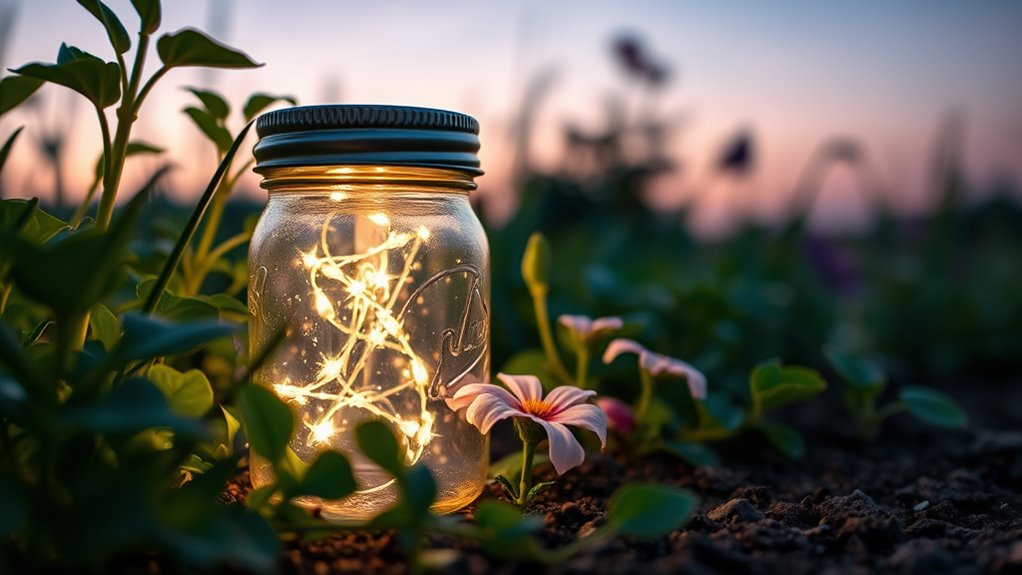
Step-by-Step Instructions
Assembling your solar mason jar lights is a straightforward process that anyone can enjoy.
Start by removing the lid from your mason jar and attaching the solar panel to the lid, ensuring the solar cells face upward. Secure any wires with glue if necessary.
Next, place the LED light inside the jar, connecting it to the solar panel. Fill the jar with decorative stones or sand for stability.
Finally, close the lid tightly, ensuring everything is in place. Set your jar in a sunny spot, and watch as it charges and lights up your garden beautifully at night!
Tips for Effective Lighting
How can you ensure your solar mason jar lights shine their brightest?
Follow these tips to maximize their effectiveness:
- Choose the right location: Place your jars in direct sunlight for optimal charging.
- Clean the solar panels regularly: Dust and dirt can diminish light output; keep them spotless.
- Use quality batteries: Invest in rechargeable batteries to enhance performance and longevity.
Placement Ideas for the Garden
When it comes to placing your solar mason jar lights in the garden, think about how they can enhance your space.
You can line pathways for safety, create charming hanging displays, or even use them as eye-catching centerpieces on tables. Additionally, consider integrating them with a vibrant vertical garden for a stunning visual effect. Each placement idea not only adds beauty but also sets the mood for evening gatherings.
Pathway Lighting Accents
Creating a charming atmosphere in your garden is as simple as strategically placing solar mason jar lights along your pathways.
These lights not only illuminate your walkways but also enhance the garden’s beauty.
To maximize their effect, consider these placement tips:
- Position them at regular intervals for consistent lighting.
- Place them near plants or garden features to highlight their beauty.
- Ensure they’re visible from various angles to create a magical ambiance.
With thoughtful placement, your garden will transform into a delightful retreat, inviting you to enjoy those peaceful evening strolls under the enchanting glow of your solar mason jar lights.
Hanging String Displays
Hanging string displays can add a whimsical touch to your garden, transforming ordinary spaces into enchanting retreats.
To create a cozy atmosphere, drape your solar mason jar lights along fences, pergolas, or tree branches. Consider positioning them over seating areas to enhance evening gatherings. You can also string them between two sturdy posts or across pathways, guiding guests with soft illumination.
Experiment with different heights for a more dynamic look. For a magical effect, cluster them in groups or weave them through plants.
With a little creativity, your garden can shine brightly, inviting everyone to enjoy its charm.
Centerpiece Table Decor
Adding solar mason jar lights as centerpiece table decor can elevate your outdoor dining experience, making it both inviting and visually striking.
Here are some placement ideas to enhance your garden tables:
- Clustered Arrangement: Group several jars together for a warm glow, creating a focal point.
- Mixed Heights: Use jars of varying heights to add dimension and interest to your table.
- Seasonal Themes: Decorate jars with seasonal elements like flowers or leaves to complement your garden’s vibe.
These tips will help you create a magical atmosphere, perfect for evening gatherings with friends and family.
Enjoy your beautifully lit outdoor space!
Tips for Enhancing the Lighting Effect
How can you transform your garden into a magical retreat with solar mason jar lights? Start by clustering your jars in groups for a more impactful glow. Use colored glass or add paint to create unique patterns. Consider placing them at varying heights to add depth. Here’s a quick guide to enhance your lighting effect:
| Technique | Description | Effect |
|---|---|---|
| Grouping | Cluster jars for stronger light | Creates focal points |
| Color Variation | Use colored jars or paint | Adds visual interest |
| Height Variation | Place jars at different heights | Adds dimension |
| Reflective Surfaces | Use mirrors or stones | Amplifies light |
| Pathway Lighting | Line paths with jars | Guides visitors |
Experiment and enjoy your enchanting garden ambiance!